How To Self Host Ghost CMS Blogging Platform On Docker / Docker Swarm
Learn How To Set Up a Ghost Blogging Platform As Your Personal Blog Within A Docker (Or Docker Swarm) Environment. All Necessary Files Included.

I'm a husband, dad, lifelong learner, tech lover, and Senior Engineer working as a Tech Lead. I write about projects and challenges in IT.
If you are reading this you decided to create a personal blog using the Ghost blogging software and are looking for a way to install it within a Docker (or Docker Swarm) environment. Don't search any longer, you are at the right place!
Within this tutorial, I will show you how to set up Ghost with Docker and run the blog with a subdomain/primary domain within your environment. Primarily I will show how to set up everything within a Docker Swarm environment but I will also provide all the necessary files to deploy it in a simple Docker environment.
Why Use Ghost?
Ghost is an open-source blogging platform that is used to create a professional blog. It was released in October 2013 as a simple alternative to WordPress because it was getting overly complex. Ghost runs within Node.js and is written in JavaScript.
Here are the main features that Ghost blogging software provides:
- Share a private link to any post. This is useful for a review. Also, you can share it with everyone and not only with people having an account on the article platform
- Ghost has a great editor that allows embedding code snippets (with Prismjs), YouTube, Twitter, Codepen, etc
- You can schedule every post so that it will be published on the exact date you selected.
- Every post/article can be optimized in terms of SEO
- You are able to add and manage authors easily
- Ghost already has more than hundreds of apps like Slack, Stripe, Shopify, etc
- There are several themes that can be customized and you are able to manually inject your personal code on the site and for every article
- Users can register for a newsletter and/or can become sponsors of your blog
Also, there are many more features that are provided by Ghost.
Prerequisite
To follow every step within this tutorial and have a running Ghost blogging Platform at the end you need to have a running Docker Swarm environment. To achieve this you should consider reading this article:
Furthermore, you need a Traefik load balancer that is used to grant Let's encrypt SSL certificates and for forwarding your services within your Docker Swarm environment. To learn about this, you can read the first chapter from this tutorial:
Additionally, I will provide files to run the Ghost blogging platform on any server running Docker with a Traefik load balancer. Please read this article to understand how Traefik is installed in a simple Docker environment:
Install Ghost
Docker Swarm
Ghost will be installed with Docker Compose. The Compose file contains the service name, settings for Traefik to have a unique URL, and an SSL certificate. Also, there are two middlewares that are used to forward requests to the main site.
To install Ghost within your Docker Swarm you can paste the following code into your docker-compose.yml which will be explained afterward.
version: "3.4"
services:
  ghost:
    image: ghost:4
    environment:
      url: https://www.${DOMAIN?Variable not set}
      mail__transport: SMTP
      mail__options__host: ${MAIL_HOST?Variable not set}
      mail__options__port: ${MAIL_PORT?Variable not set}
      mail__options__auth__user: ${MAIL_USER?Variable not set}
      mail__options__auth__pass: ${MAIL_PASS?Variable not set}
      mail__from: ${MAIL_FROM?Variable not set}
    volumes:
      - content:/var/lib/ghost/content
    networks:
      - traefik-public
    deploy:
      placement:
        constraints:
          - node.labels.blogs.knulst == true
      labels:
        - traefik.enable=true
        - traefik.docker.network=traefik-public
        - traefik.constraint-label=traefik-public
        - traefik.http.routers.blogs-knulst-http.rule=Host(`www.${DOMAIN?Variable not set}`) || Host(`${DOMAIN?Variable not set}`) || Host(`blog.${DOMAIN?Variable not set}`)
        - traefik.http.routers.blogs-knulst-http.entrypoints=http
        - traefik.http.routers.blogs-knulst-http.middlewares=https-redirect
        - traefik.http.routers.blogs-knulst-https.rule=Host(`www.${DOMAIN?Variable not set}`) || Host(`${DOMAIN?Variable not set}`) || Host(`blog.${DOMAIN?Variable not set}`)
        - traefik.http.routers.blogs-knulst-https.entrypoints=https
        - traefik.http.routers.blogs-knulst-https.tls=true
        - traefik.http.routers.blogs-knulst-https.tls.certresolver=le
        - traefik.http.services.blogs-knulst.loadbalancer.server.port=2368
        - traefik.http.middlewares.redirect-blog.redirectregex.regex=^https://blog.${DOMAIN?Variable not set}/(.*)
        - traefik.http.middlewares.redirect-blog.redirectregex.replacement=https://www.${DOMAIN?Variable not set}/$${1}
        - traefik.http.middlewares.redirect-blog.redirectregex.permanent=true
        - traefik.http.middlewares.redirect-nosub.redirectregex.regex=^https://${DOMAIN?Variable not set}/(.*)
        - traefik.http.middlewares.redirect-nosub.redirectregex.replacement=https://www.${DOMAIN?Variable not set}/$${1}
        - traefik.http.middlewares.redirect-nosub.redirectregex.permanent=true
        - traefik.http.routers.blogs-knulst-https.middlewares=redirect-blog, redirect-nosub
volumes:
  content:

networks:
  traefik-public:
    external: true
Line 4: Up to date version of Ghost v4 will be used during installation
Line 6: The main blog URL will be defined as an environment variable within the docker service
Line 7 - 12: This section can be used to set mail configuration for sending registration emails, invitations, password resets, or member login links. This email cannot be used for newsletter emails. For this feature, you have to set up a service like Mailgun. Read more about it within the Ghost documentation.
Line 13 - 14: The content of the website will be saved as a persistent volume within your Docker environment
Line 15 - 16: The main traefik network will be used here. This is important because otherwise, Traefik cannot forward requests to the service
Line 18 - 20: The service will only be deployed to a Docker Swarm node if the label blogs.knulst is true. This can be achieved by executing the following command before deploying the docker-compose.yml to the stack:
docker node update --label-add blogs.knulst=true ID_OF_NODE_TO_USE
Replace ID_OF_NODE_TO_USE with the correct ID of any worker/manager node of your Docker Swarm where the service should run.
Line 21 - 31: Set up a standard configuration for a service deployed in a Docker Swarm with Traefik and Let's Encrypt certificates. In Line 19 and 22 three URLs are registered for this service: www.${DOMAIN}, ${DOMAIN}, and blog.${DOMAIN}.
Line 32: Port used by Ghost blogging Docker container. Needed for Traefik.
Line 33 - 35: Creates a permanent Traefik middleware that forwards every request from blog.${DOMAIN} to www.${DOMAIN}
Line 36 - 38: Creates a permanent Traefik middleware that forwards every request from ${DOMAIN} to www.${DOMAIN}
Line 39: Activates the earlier created middleware for this service. This is done because I only want to have one primary website for my blog but multiple URLs to reach it.
Before deploying (or redeploying) multiple environment variables should be set with (adjust them to your needs):
export DOMAIN=knulst.de
export MAIL_HOST=smtp.your-domain.de
export MAIL_PORT=587
export MAIL_USER=blog@knulst.de
export MAIL_PASS=unbelievablehowsecurethisis
export MAIL_FROM=blog@knulst.de
Then you can deploy the Docker Swarm stack by executing:
docker stack deploy -c docker-compose.yml blog
Docker
If you do not have a running Docker Swarm you can download this Compose file.
Within this file, there are only two differences from the Docker Swarm Compose file. The first is in Line 17 where a new setting is used: restart: always. This configuration is used to automatically restart the Docker service if it is aborted. The other change is that labels are removed from the deploy - keyword and put to a higher order within the Compose file. This is done because deploy is only used in a Docker Swarm environment but labels can also be used in a simple Docker environment.
Keep in mind that this will only work if you have a running Traefik load balancer.
Before starting the docker service multiple environment variables should be set with (adjust them to your needs):
export DOMAIN=knulst.de
export MAIL_HOST=smtp.your-domain.de
export MAIL_PORT=587
export MAIL_USER=blog@knulst.de
export MAIL_PASS=unbelievablehowsecurethisis
export MAIL_FROM=blog@knulst.de
Then you can start the Docker service by executing
docker-compose up -d
Configure Ghost
If you reached this step Ghost blog is already installed on your URL with the default Casper theme and will look like this:
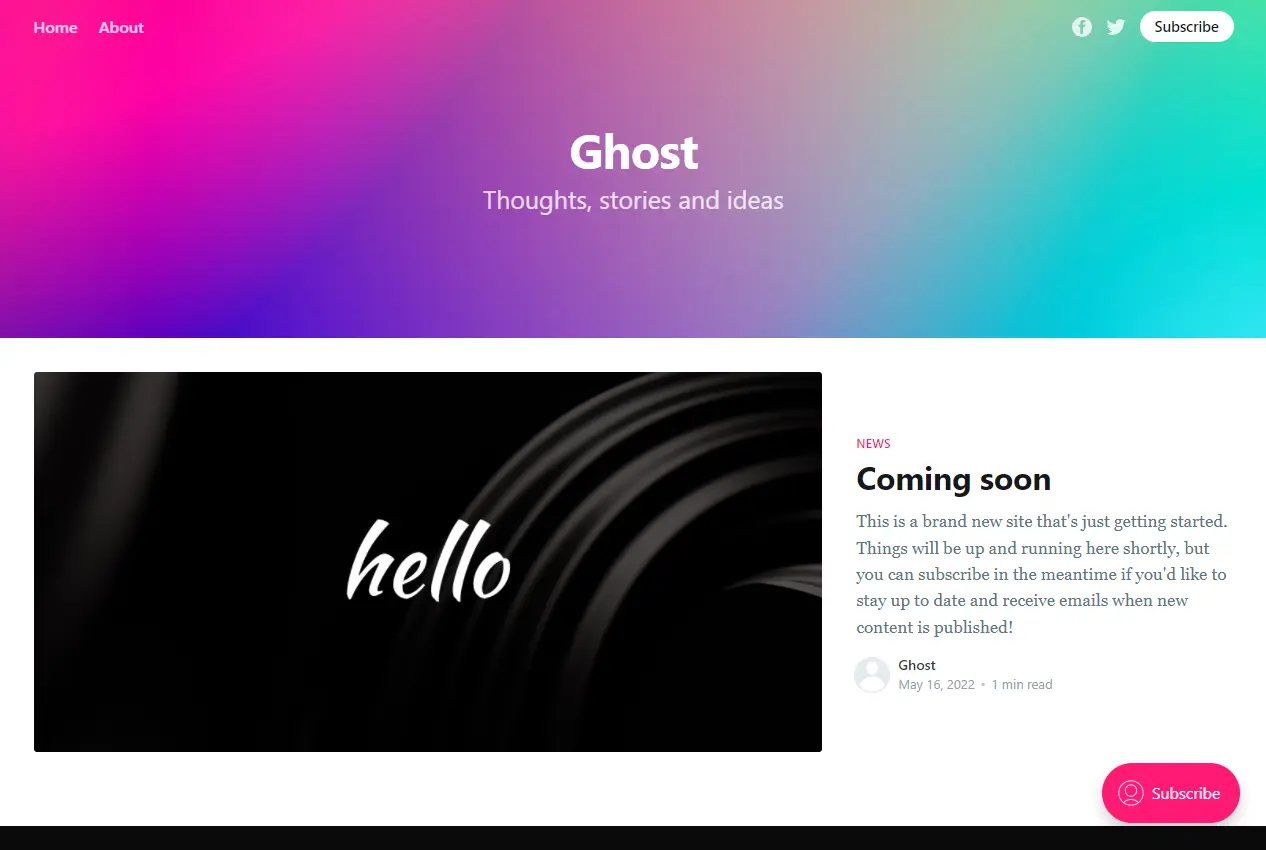 |
Now you have to configure your Ghost blog instance by opening your website and appending the ghost path to open the Admin menu (should be https://your-domain.de/ghost).
If you open the admin menu you have to set the title, your name, your email address, and a secure password:
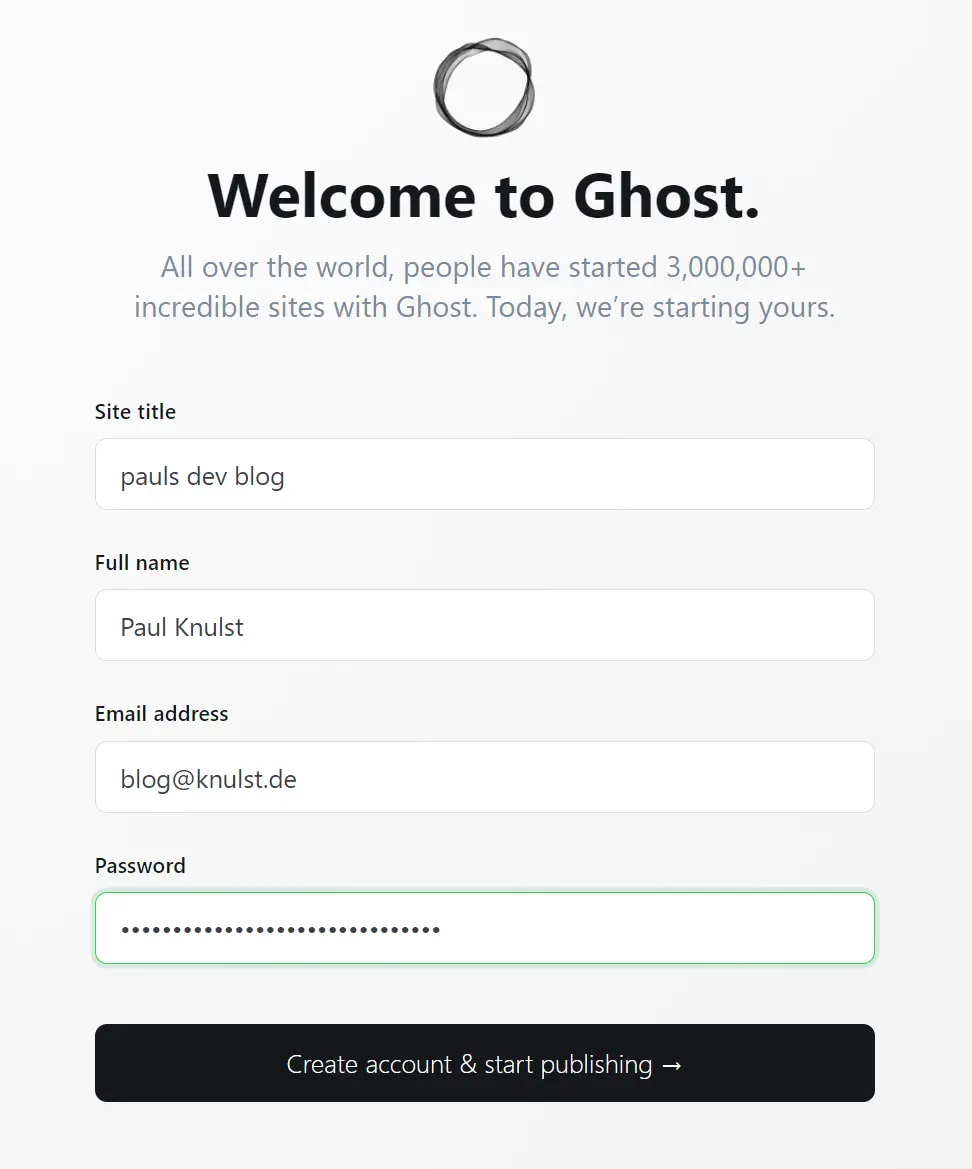 |
After you create the account you should receive an email from your blog. If you do not receive any mail you can check the docker logs about email problems.
The last step will be adjusting the personal settings of your newly created blog. For this, you can open the Ghost blog settings (https://your-domain.de/ghost/#/settings) which should look like this:
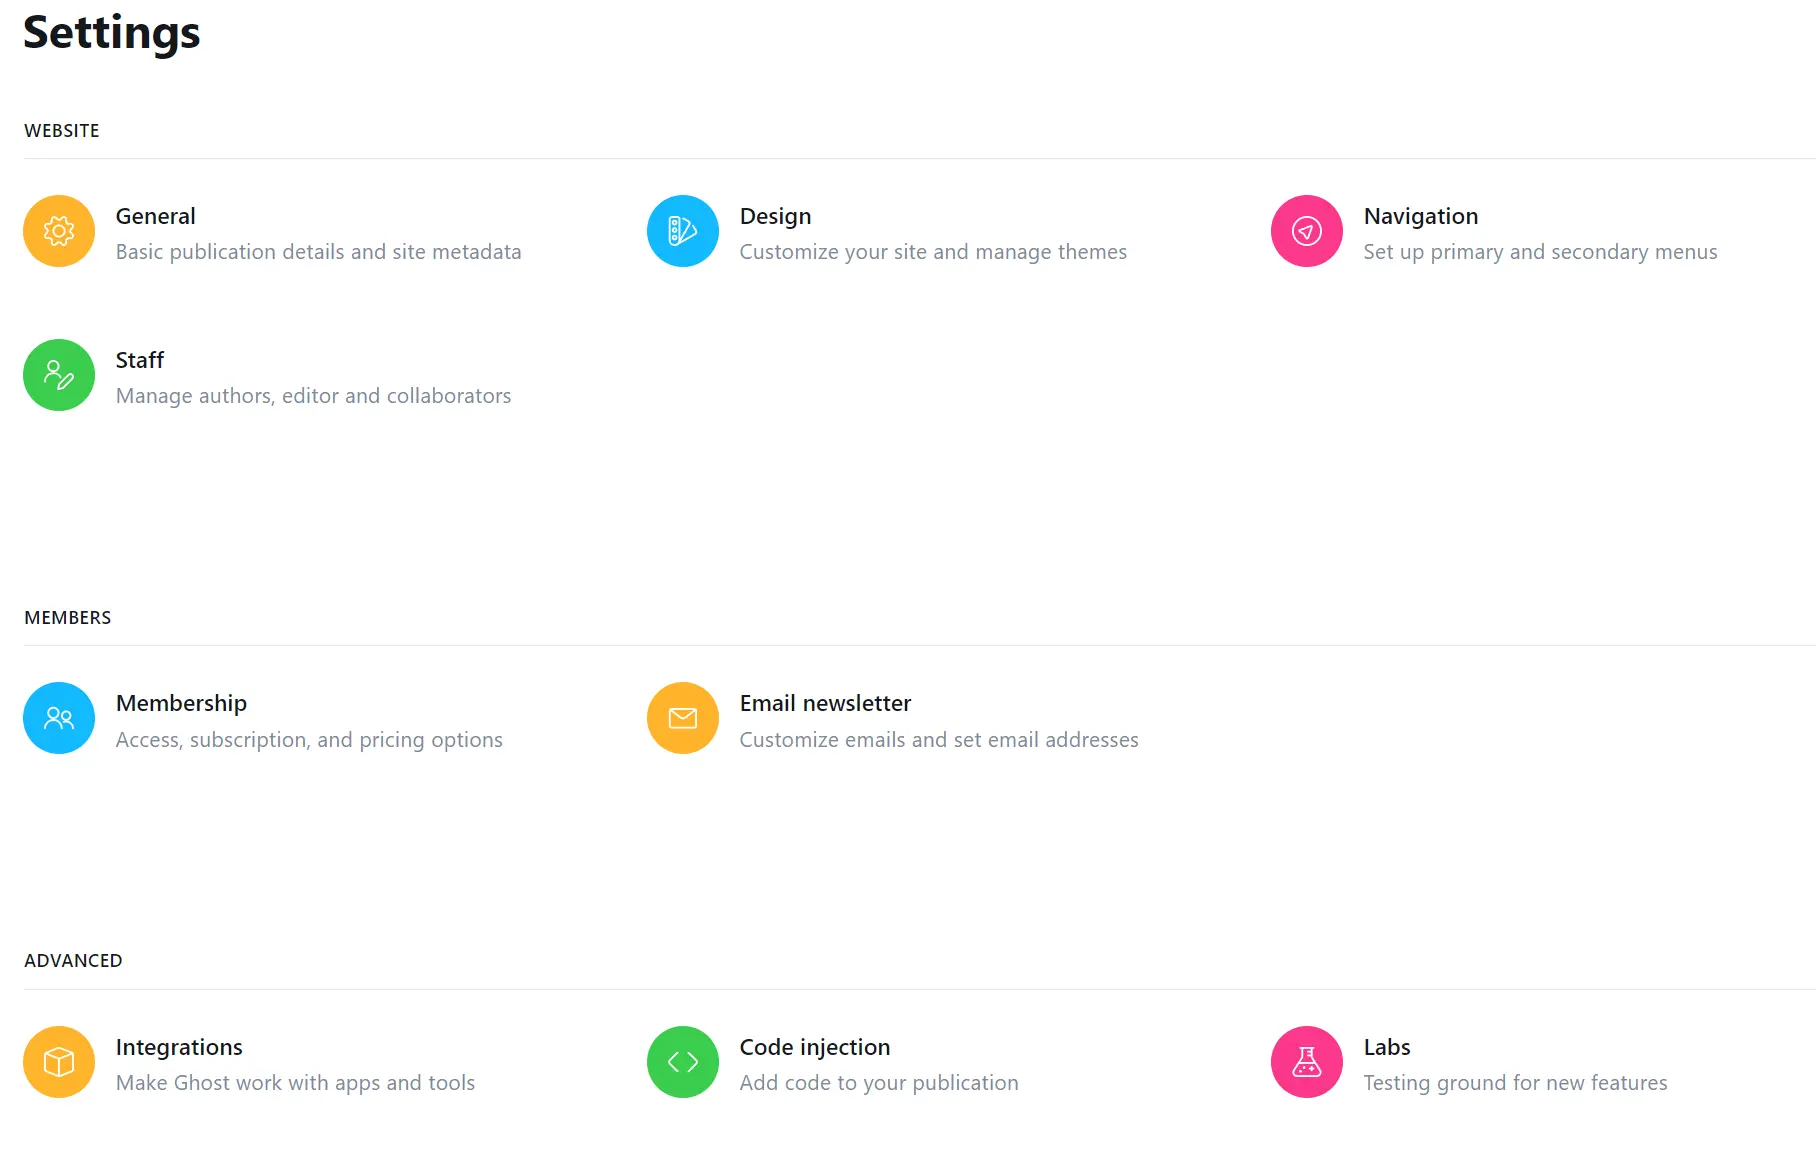 |
Select General and adjust everything to your needs. Afterward, you should open Design and install a theme that suits you. I can recommend Liebling by Eduardo Gómez. It has already inbuilt translations and looks very good.
Furthermore, I would suggest selecting Membership, connecting your Stripe account, and enabling paid registration as an additional Membership alternative. Within my blog, I have done this too but I do not provide extra content only to paying members. It is only activated if someone wants to sponsor me regardless of the content that is provided.
Closing Notes
Congratulations you have just installed your own Ghost blog. If you want to improve the user experience or do more with your blog you can:
- Sign up on Grammarly and install the web extension to optimize articles
- Customize the design with pictures or a theme
- Set up analytics with Google analytics
- Add code syntax highlighting
- Add comments to the posts
This is the end of this tutorial. Once you finish setting up your personal blog, share it with me on Twitter. I will love to see that!
This article was originally published on my blog at https://www.paulsblog.dev/how-to-self-host-ghost-blogging-platform-on-docker-docker-swarm/
Feel free to connect with me on my blog, Medium, LinkedIn, and Twitter.
🙌 Support this content
If you like this content, please consider supporting me. You can share it on social media or buy me a coffee! Any support helps!
Furthermore, you can sign up for my newsletter to show your contribution to my content. See the contribute page for all (free or paid) ways to say thank you!
Thanks! 🥰
Photo by Damian Zaleski / Unsplash