How To Backup Your Files To AWS S3
A quick visual enhanced tutorial covering every step that is needed to save your valuable files to AWS S3.

I'm a husband, dad, lifelong learner, tech lover, and Senior Engineer working as a Tech Lead. I write about projects and challenges in IT.
Paul Knulst in Programming • Dec 1, 2021 • 4 min read
This article will give you a quick visual enhanced tutorial covering every step that is needed to save your valuable files to AWS S3. It will guide you on how to back up your data to AWS S3. S3 is an abbreviation of Simple Storage Service and provides multiple ways to upload a file or folder.
- Upload using Drag and Drop
- Upload using AWS CLI in the terminal.
From the above-mentioned ways, I will explain How-To upload using the AWS CLI
Prerequisite
Amazon AWS Account
To create a FREE AWS account go to https://aws.amazon.com/free/ and create your account. To follow this tutorial you need to have an account.
S3 Bucket
S3 will be used to store your backup. An S3 bucket can be created at https://s3.console.aws.amazon.com/s3/home. You have to choose a bucket name and can keep the default values except for encryption.
I would suggest that you enable default encryption
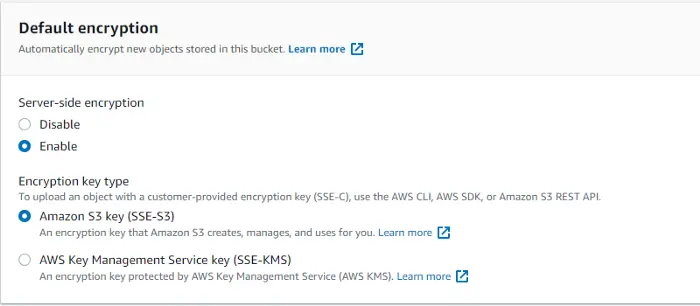
Screenshot of bucket creation taken by the author
IAM Credentials
To create IAM Credentials to access your S3 bucket open your account menu (top right corner) and click Security Credentials
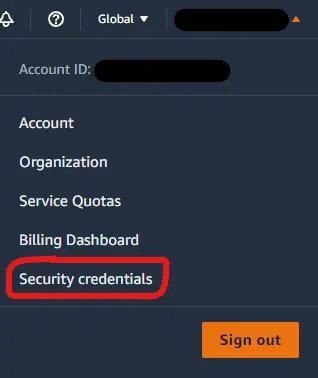
Screenshot of user menu taken by the author
Now switch to Access keys (access key ID and secret access key) and create a new access key by clicking the button
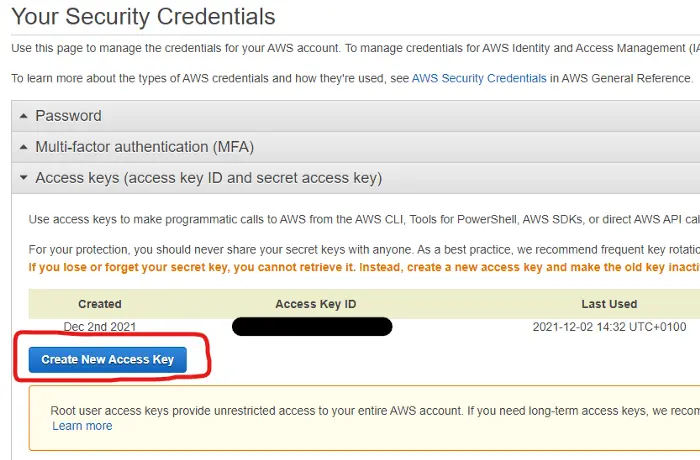 |
Additionally, you can find much information about creating AWS access keys in the Amazon knowledge base:
Install AWS CLI
Installing the AWS CLI can be done on Linux (and on Windows in the Ubuntu WSL 2 CLI) with
sudo apt-get install awscli
Configure AWS CLI
After the AWS CLI is installed check the version
aws --version
As I created this How-To I was using Windows with this version
 |
Now you can set your IAM credentials for your machine. Start the process to enter your credentials
aws configure
Type in your AWSAccess Key ID, AWSSecret Acces Key, a default region, and an output format. Confirm every line with . It should look like this:
 |
Backup your files
Now you are ready to back up your files to your bucket. Two important commands can be used: Copy and Sync
Copy
Copy can be used to copy a file or folder to S3. It will overwrite files if they are already within your bucket. For copying a folder you have to use --recursive. The following command will copy a <SOURCE_FOLDER> to a DST_FOLDER in your YOUR_BUCKET_NAME within S3.
aws s3 cp --recursive <SRC_FOLDER> s3://BUCKET_NAME/DST_FOLDER/
Sync
With Sync you can keep the content of a folder on your machine in sync with the folder within your S3 bucket. The following command will sync your local SRC_FOLDER with your DST_FOLDER in the S3 bucket s3://BUCKET_NAME.
aws s3 sync <SRC_FOLDER> s3://BUCKET_NAME/DST_FOLDER/
Closing Notes
I hope you enjoyed reading this article. I hope it can help you to back up your valuable data to an Amazon AWS S3 bucket. I would love to hear your thoughts and if you have any questions please contact me.
This article was originally published on my blog at https://www.paulsblog.dev/how-to-backup-your-files-to-aws-s3/
Feel free to connect with me on my personal blog, Medium, LinkedIn, Twitter, and GitHub.
Did you find this article valuable? Want to support the author? (... and support development of current and future tutorials!). You can sponsor me on Buy Me a Coffee or Ko-Fi. Furthermore, you can become a free or paid member by signing up to my website. See the contribute page for all (free or paid) ways to say thank you!
Photo by Mikhail Nilov / Pexels